- Download the file
- XLSTART: Figure out if you are on 32 or 64 bits
- Version Check
- Install the add-in in a folder of your choice
- Install the add-in in the Excel Library
- Are you on Linux? Coming soon
- Are you on Mack? Send a request
If you didn’t do it yet, please download the file. You will received a compressed file (.zip, .rar or .7z), and you have to extract it. You will see two .xll files. They are the same add-in but one is the 32 bit version, the other runs at 64 bits. You can easily tell which one is the 64 bit version because you can read 64 in its name: ModernFunctionsUpdate-AddIn64-packed.xll
While by exclusion: ModernFunctionsUpdate-AddIn-packed.xll runs at 32 bits.
If you don’t know which one of the two files you have to install, please follow the next step. If you already know if you are running on 64 or 32 bits, please skip the next step and click here.
Use XLSTART Folder – For Testing
Although you can install the add-in in this way, XLSTART is perfect for testing. Especially if you don’t know which version of the add-in you should run. For a proper installation, please use this other method: click here.
You can proceed simply pasting both .xll files (64 and 32 bit versions) into your chosen XLSTART folder.
User-specific Paths
This path works for most recent versions of Excel and is generally the simplest to use:
C:\Users\YourUsername\AppData\Roaming\Microsoft\Excel\XLSTART
You can paste this address directly into the File Explorer address bar to reach the folder instantly.
All Users Paths
If you want to install the add-in for all users, here are the paths based on your Office version. The XX variable corresponds to the Office version number (e.g., 12 for 2007, 16 for the most recent versions).
- Office 365 and Office 2019, 2021:
- 64-bit:
C:\Program Files\Microsoft Office\root\OfficeXX\XLSTART - 32-bit:
C:\Program Files (x86)\Microsoft Office\root\OfficeXX\XLSTART
- 64-bit:
- Office 2016:
- 64-bit:
C:\Program Files\Microsoft Office\Office16\XLSTART - 32-bit:
C:\Program Files (x86)\Microsoft Office\Office16\XLSTART
- 64-bit:
- Office 2013:
- 64-bit:
C:\Program Files\Microsoft Office\Office15\XLSTART - 32-bit:
C:\Program Files (x86)\Microsoft Office\Office15\XLSTART
- 64-bit:
- Office 2010:
- 64-bit:
C:\Program Files\Microsoft Office\Office14\XLSTART - 32-bit:
C:\Program Files (x86)\Microsoft Office\Office14\XLSTART
- 64-bit:
- Office 2007:
- 64-bit:
C:\Program Files\Microsoft Office\Office12\XLSTART - 32-bit:
C:\Program Files (x86)\Microsoft Office\Office12\XLSTART
- 64-bit:
Run Version Check
Open Excel. It might take a while to load the first time, since it is checking both of the new files.
Once it is open, go to your new tab “Modern Functions” or “New Functions” the name change dynamically according to your version of Excel. Press on the green V on the left side and run version check:
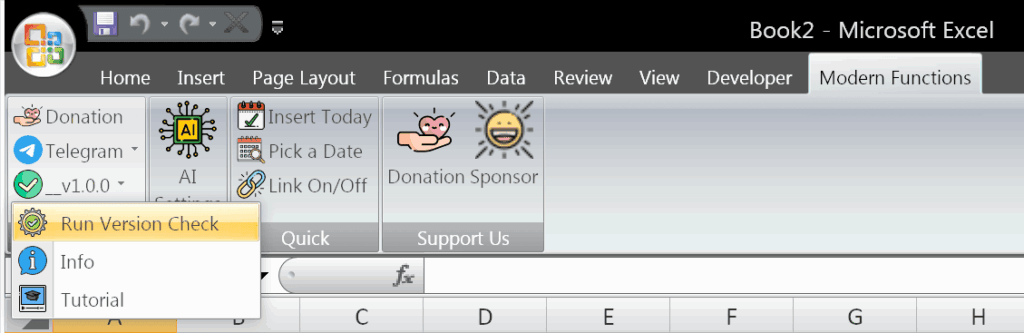
MFU will run a check and will tell you what architecture you have. Make sure that your Operative System, you Office and you add-in have the same bits and preferably language as well.
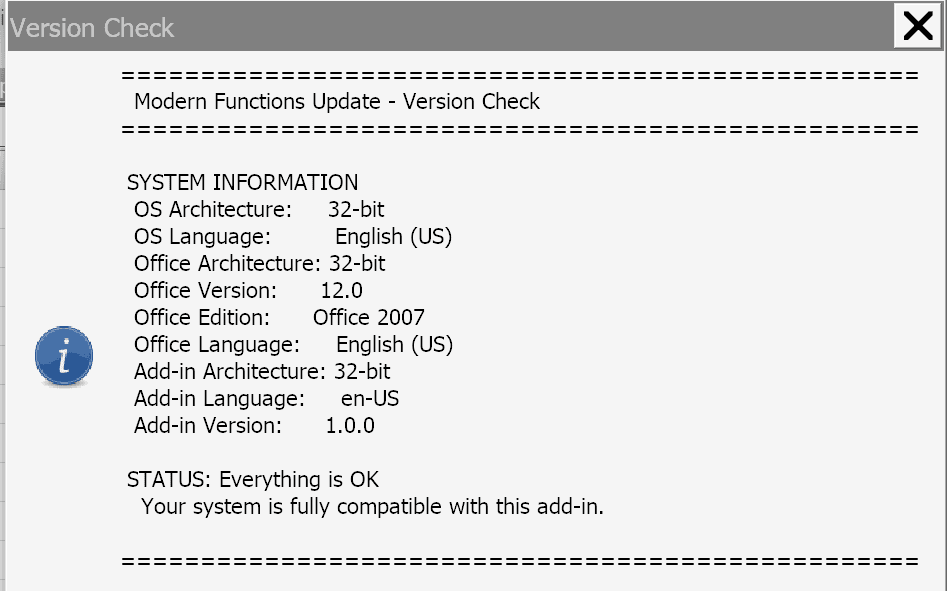
From here you can easily understand which of the two files you need. Remember, keep everything (OS, Office and add-in) with the same bits, and try to keep the language consistent as well.
Installing via Excel (Best Method)
Now that you know perfectly which of the two files you are supposed to run, the 32 bit or the 64 bit version, you can proceed for a proper installation. This method gives you more control over your add-in and its updates.
Please make sure to remove the add in from XLSTART, if you put it there following the previous step.
Step-by-Step Installation
1. Create a Dedicated Folder
Choose a permanent location on your computer (e.g., C:\ExcelAddIns\ or Documents\Excel Addins\) and create a simple folder to store your add-in files. This folder should not be moved or deleted after installation, as Excel will reference it.
2. Copy the Correct File
Based on your Excel architecture:
- If you have 64-bit Excel → copy
ModernFunctionsUpdate-AddIn64-packed.xllto your folder - If you have 32-bit Excel → copy
ModernFunctionsUpdate-AddIn-packed.xllto your folder
Note: Make sure to remove the file from XLSTART, you cannot run both at the same time.
3. Install the Add-in from Excel
- Open Excel
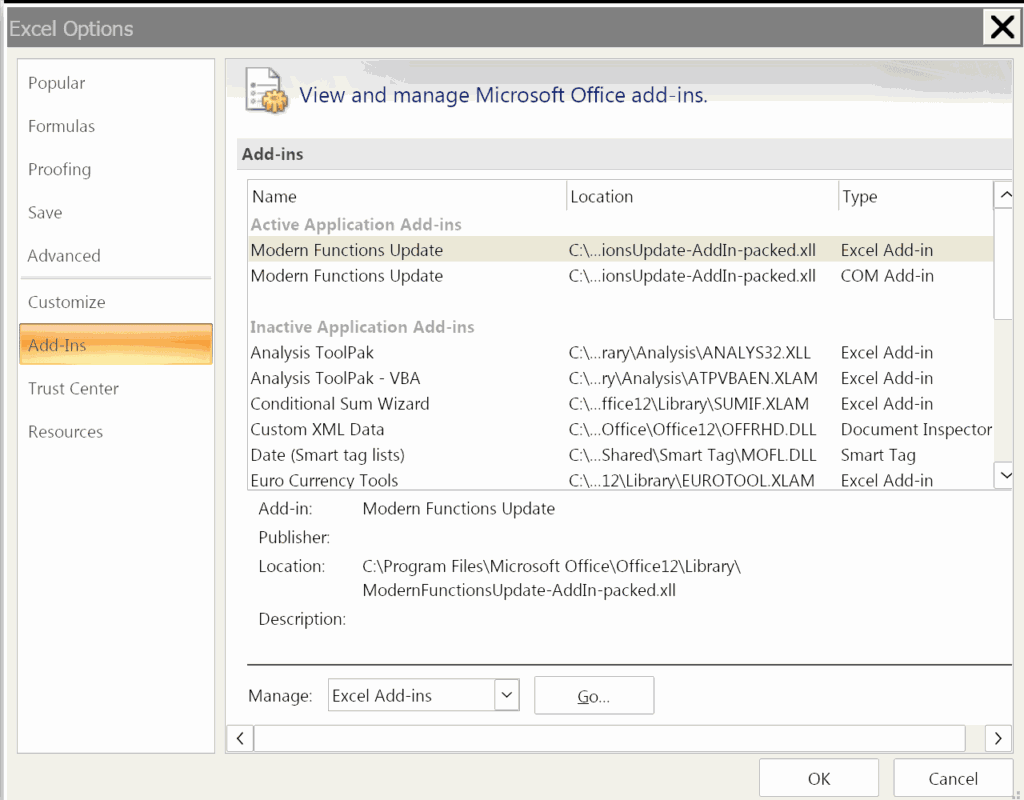
- Go to File → Options
- Select Add-ins from the left sidebar
- At the bottom of the window, next to Manage, select Excel Add-ins from the dropdown menu and click Go…
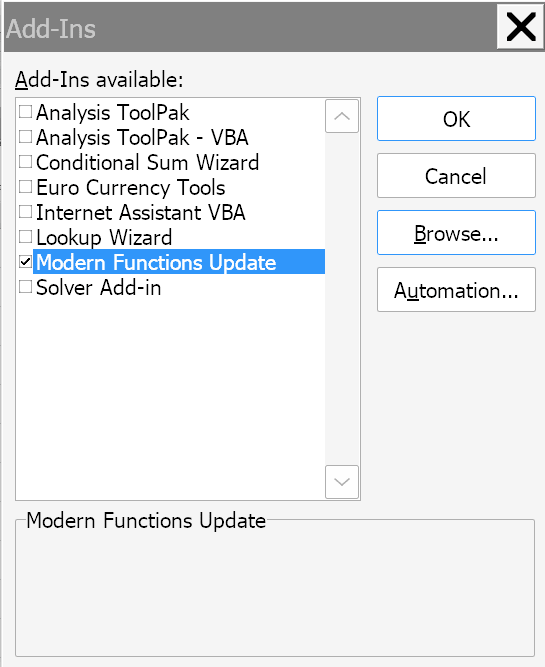
- In the Add-ins dialog box, click Browse…
- Navigate to the folder where you saved your
.xllfile, select it, and click OK - The add-in will now appear in the list. Make sure the checkbox next to it is checked
- Click OK to confirm. it might take a while to load
- Restart Excel. Just to doble check.
- You should see the add-in’s functionality available on a new ribbon tab
Done!
From now on, if you don’t like to have it, just open the same window and deselect the add-in.
Use the Excel Library (Alternative Method)
Another, slightly more professional option is to put the add-in directly inside the Library of Excel, where all the default add-ins are. You can easily find the path of this folder by going in File> Excel Options> Add-ins, and you can see it from here clearly by selecting one of the default add-ins like the Solver:
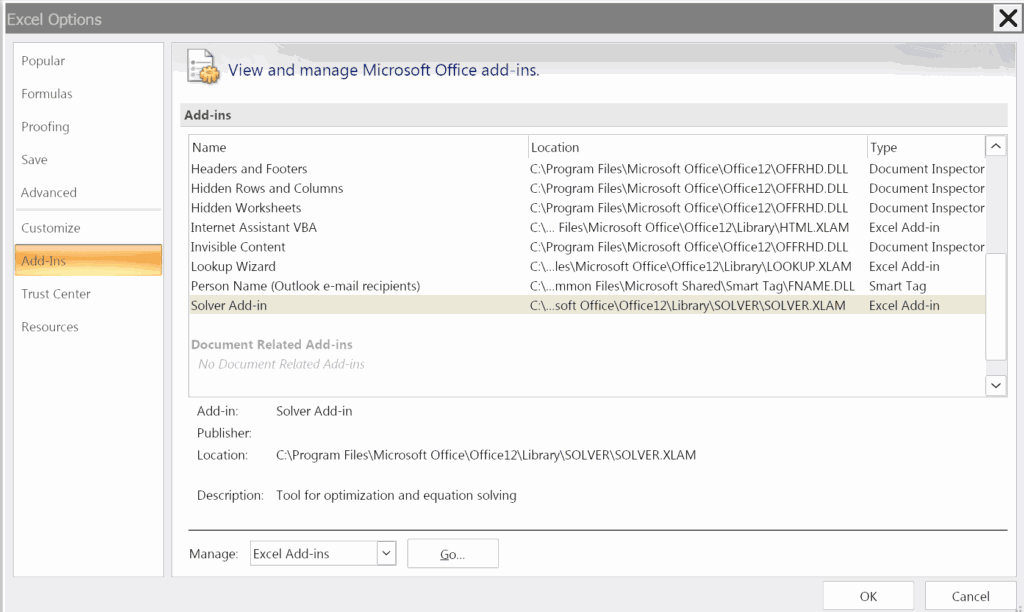
You need to already know which of the two file you need, the one at 32 or the one at 64 bits. After placing the file in the Library, you have to install it as you did for the previous step. You have to browse in your folders and add the add-in.
Note: delete all the other copies in XLSTART or from the previous method. You can run only one method at the time.
The only main advantage here is that the add-in files are most likely to no be deleted by mistake since they are inside a folder of Office and not in a easily accessible place.
See Also
- Are you on Linux? Coming soon
- Are you on Mac? Send a request
- New functions lists